Tuesday, December 30, 2008

Bottle Cap Cookies

We had a little party for the Winter Solstice this year and we wanted to make sugar cookies, but we didn't have any cookie cutters. We made a few using the old-fashioned upside-down glass method, and then went hunting for other things around the house that we could use.

We made a big batch of adorable bite-sized cookies, using a bottle cap as a cookie cutter. Take one bottle cap and one wine cork and a hot glue gun. Hot glue the cork onto the bottle cap. Now you can use the cork as a handle to punch out your cookies.

Make your favorite sugar cookie recipe. I learned from a recipe this time that you can use powdered sugar instead of flour to ease the rolling of the dough. The cookies are small, so they'll cook a bit faster than normal. Decorate them with your favorite icing and candies.


Sunday, December 7, 2008

Someone Else Knit my Hat

Picture 14.png

Someone else knit my Space Invaders hat and was nice enough to send me a picture of it on Instructables. She did a cool modification of the pattern and I think both hats look great.

Saturday, November 29, 2008

Tuesday, November 18, 2008

Fingerless Gloves

I found a pattern that I liked for fingerless gloves, but which only came in a big man's size, so I rewrote the pattern for a smaller hand (and an even smaller hand, and a really little hand). The gloves I knit here are the womens' large. Click on the "read more" link for the pattern.


Womens' Fingerless Gloves
Materials
Sport weight or light weight worsted yarn, a little over 100 m
Set of 4 US size 2 / 2.75 mm dpns
Stitch holder
Yarn needle
Stitch markers
Gauge
6 sts / inch
Right Glove
Wrist
Cast on 36 (32, 28), sts on 3 dpns.
Work in K2, P2 ribbing for 2.5"-3" or desired length.
On the last round of ribbing, increase 4 stitches evenly after every 9th (8th, 7th) stitch.
You should now have 40 (36, 32) stitches.
Knit 4 rounds in stockinette.
Thumb gusset
On the next round, place a stitch marker, P1, increase one stitch, K4, increase one stitch, P1, K to finish the round.
K the next two rounds, but P the two P stitches on either side of the thumb gusset.
Continue to increase two stitches every third round, inside of the P stitches in the thumb gusset until there are 12 (12, 10) sts between the two P stitches.
Next round after you have 12 (12, 10) inside the two P stitches: K1, slip the 12 (12, 10) sts onto a holder, cast on 4 sts, join and K around.
Knit in stockinette for about 6 rounds, or desired length to beginning of fingers.
Last row: stop knitting 7 (6, 6) stitches before the center of the thumb-side of the glove.
First Finger
Leave 6 (6, 6) stitches on a needle in front of the center of the thumb side of the glove, and put 7 (5, 5) stitches behind the center of the thumb side onto another needle. Slip the rest of the stitches onto a piece of scrap yarn. (You can leave the scrap yarn in the stitches and just pull it out at the very end if you want.)
Knit the 12 (11, 11) stitches, take a third needle and cast on 3 for the gusset, and knit around until the finger is as long as you want it. (an inch or so is pretty good).
Change to K1 P1 rib for 4 rounds.
Bind off.
Second Finger
On three needles, pick up 4 (4, 4) sts from the back of the hand, 3 sts from the gusset, 5 (4, 3) sts from the front of the hand, and cast on 3 for the gusset.
Join and work as for the fist finger.
Third Finger
On three needles, pick up 4 (4, 3) sts from the back of the hand, 3 (3, 4) sts from the gusset, 5 (4, 2) sts from the palm of the hand, and cast on 3 for the gusset.
Join and work as for the other fingers.
Little Finger
Use the remaining 9 (9, 9) sts and pick up 3 (3, 2) sts from the gusset.
Work as for the other fingers.
Thumb
Pick up the 12 stitches from the stitch holder on 3 needles and pick up 4 stitches in the gusset. Knit to desired length and finish in K1, P1 ribbing. You will have to P the two last stitches together for the ribbing because we have an uneven number. Bind off.
Left Glove
Work as for right glove, but pay attention to how many stitches are on the back of the hand and the palm for fingers.

Monday, November 10, 2008

Text Art

A friend of mine is thinking about putting a text on his wall in his new apartment. I have recently seen a really amazing text + drawing installation but I can't find it now. Instead I found a bunch of other inspiring text art. If you can help me find the one that I was looking for, I would love that. Fiona Banner's work is the closest to it, but it's not her. It was an installation in a gallery, the text overlapping with itself, sort of crowding into the corner, with illustrations breaking out of it. I saw it on the internet. It was red.

Click "continue reading" to see all the cool stuff I found while looking for the one I wanted.


Wednesday, October 29, 2008

Deutschkurs Dokument

This week I started finally using the video camera I got for my last birthday. I am filming a documentary about my German class. I just film stuff during breaks. We get two 20-minute breaks per class.

Making documentary movies has been a big fantasy of mine for a long time, so I'm both excited and nervous about really doing it. Starting a project is the second-hardest part, though, so I'm over that hump.

The movie is going to concentrate on the students in the class, not the organization that runs the school, not the teacher, not the space we're in. I'm not sure exactly what the film will be about in the grand sense, but I'm trying to set up a few constraints for myself to make the task less daunting and more focussed.

I think it will be cool to learn more about all the people at the same time as the people learn more and more German to talk about themselves. I'm potentially in the class for seven more months.


Monday, October 20, 2008

Finally, One for Myself

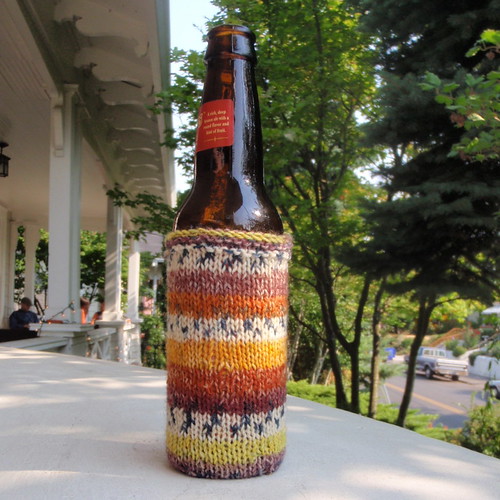
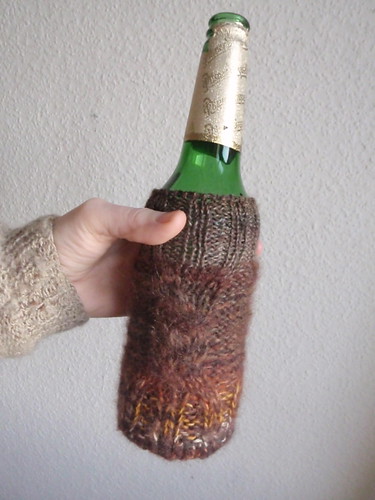
I've made a bunch of these beer cozies this summer and have given them as presents to people we stayed with on our road trip. Recently I made one for Dan for his birthday. Finally, I have gotten around to making one for myself. I used two kinds of sock yarn I had left over and some leftover mohair. I ran out of mohair before the top ribbing and had to change needles, but I like the way it turned out.

I started making these from a pattern in the book Knitting With Balls, but since the first cozies I have improved the pattern from the book a lot. I keep meaning to write up a nice how-to. This one is Berliner-sized for gigantic beer bottles.

Tuesday, October 14, 2008

A Little Game

Erik, Vigo, and I have been trying to make a drawing a day. We've had limited success. See if you can guess who drew what. One drawing is by Iris.

Click on the link and say in the comments who you think drew what.


Monday, October 13, 2008

The Instructables Book is Out

Picture 3.png
The Instructables book, featuring my screenprinting how-to, is out now. Have a look. I haven't gotten my free copy yet, but I'm looking forward to it.

I didn't make the cover, but you can get my instructable as a free pdf sample on the book's page.


Sunday, October 12, 2008

Bust

I haven't done any kind of sculpture in a long time, so I decided to kind of get my chops back by doing a very small bust of Vigo in clay. I plan to use this project to teach myself some things about making molds. The only kind I know how to make now are plaster molds that can only make one piece because you have to break the mold to get your sculpture out. I'd like to learn how to use something else and make a little series in different materials to see how they compare. This is also an exercise in documentation which has always been a weak spot for me.

I've only sat down to this piece three times so far. The light in our apartment is not so great, so I have to work on it on weekends, in the daytime or I really can't see what the hell I'm doing. The other hindrance I have is that we don't have a high table or stool for me to put the piece on, so I end up working on it in uncomfortable positions. I have a serious kink in my neck right now. My main problem is that I'm just out of practice. Luckily, I'm not in any big hurry to finish this project.

Here are a couple pictures in chronological order of the work in progress. The last two are from today. You can see I didn't leave off on a high spot, but my neck was killing me!


Friday, September 12, 2008

Wallet Hunting

I'm in the market for a new wallet, so I went on Etsy to see what kind of nice handmade stuff I might find. I need something that can handle coins and is big enough for Euros. I'm probably going to hunt here in the local shops instead of buying something online, but here are my favorites from Etsy.

Maybe I'll make my own...

El Chupacabra Wallet by handsomeleather, $100


Red Bees Wallet by handsomeleather, $100.00

Mal, by Israeldgifts, $98

Tri-Fold Bike Wallet, by larrysleatherwork, $55

Wonder Wallet, by mishidesign, $120

4-Pocket Money Organizer by valhallabrooklyn

Legal Pad Pocketbook by QuietDoing (who has lots of cool stuff), $49

Sparkly Crow by hippofabulous, $40

Clutch by RidikRidonk, $38

Ziparound Wallet by bonspielcreation, $36

Tuesday, August 5, 2008

Whose Hat is it?


In my quest to get rid of all these little yarn leftovers, I made this hat. The red yarn there is now all used up. Yippee. I didn't have anyone in mind when I made this hat, so it is a hat in search of a head. I guess when I find the right head for the hat, I will know. Several people have tried it on so far, but nobody has had a real click.

Using Up Some Sock Yarn


I made Vigo some socks with these two colors of sock yarn and I had a little of the brown, and almost a full skein of the green left over. I used the green yarn to knit my first pair of toe-up socks and a matching beer cozy (serious accessorizing!). I still have a little more of the brown left over. Enough for another beer cozy, I think. I can't wait to be rid of it! It feels good getting to the end of these small leftovers. I'm a little sick of beer cozies now and I'm going to make a few hats now.

Monday, July 14, 2008

My Instructable is up for a Prize

A couple years ago I wrote a nice Screenprinting Instructable. I'm very proud of it. It's had a couple hundered people comment on it and has sort of become a little community unto itself, with people asking questions and other people offering extra tips and advice.

If you're an instructables member, log in and and vote for me. It's easy to do. I'm right there in the Most Viewed section of the contest page.

If you're not a member of instructables, you should check it out. Erik used it for boat building a couple times, and there are just oodles of projects and ideas there.

Learning Toe-Up Socks

I first was inspired to knit toe-up socks by this Firestarter pattern, which I discovered through the Knitters Unscensored podcast.

I downloaded the free pattern, bought some fancy sock yarn, and took out my needles, but I had no idea how to start the pattern. I read it a few times, looked up short rows in my Knitters Handbook and decided to work a little more on the cardigan I've been knitting for Vigo for the past two years.

When packing up for our move to Berlin, I decided to pack away all my big projects and all my real stash and only keep out the "fond de stash," the bottom-of-the-barrel half-balls of leftover whatnot that it would be healthy to use up. Mostly I've been knitting beer cozies, but this weekend I decided to make a plan to tackle the toe-up sock.

Of course, I've been quietly forming this plan in my head since that day with the Firestarter, so I'd already done a little bit of research.

Step One: Start Simple
Using the magic cast-on (which is dead simple and works like a dream), knit one pair of Wendy's Fingering Weight, Toe-Up Socks with Gusset Heel. This is a recipe for the most basic toe-up sock

Step Two: Get Fancy
I have a pattern for lace toe-up baby socks to knit next. They're more complicated, but they're small, so I won't have to spend the rest of my summer knitting them

Step Three: Tackle the Firestarters

I started on step one this weekend and was surprised to discover that once I learned the magic cast on, the challenge really isn't that great. I was both relieved and disappointed about this, and I don't know why I was so surprised. It's always like that with knitting. Before you try a new technique, the new task always seems complicated. The way knitting patterns are written really doesn't help, either. But then once you just dig in and do it, it's always really easy. I had the same experience being intimidated by cables.

Monday, June 16, 2008

Onesies

I spent most of my weekend finishing up printing projects so I can pack all my supplies. Here's a series of onesies I made for Justine's new baby Sienna, and one for Derrick & Nina whose baby is expected any minute now.

onesies.png

Wednesday, May 7, 2008

Pattern For Hot Water Bottle Cozies

I wrote up the pattern for one of the hot water bottle cozies I made.

I even made a pdf...

Look in the extended entry for the pattern

The Coziest Hot Water Bottle Cover Ever
I designed these as gifts for my husband's sisters and parents. Part way through knitting the third one I started to think, "Is this a weird present? Hot water bottles and cozies all around!" But by then it was too late to turn back and everyone loved them. In fact, I got the flu the weekend I gave these gifts and ended up using one of these for the weekend. The cozied hot water bottle just might become your new best friend. These bulky, fuzzy babies keep the water warm for hours and hours and hours.
yarn
One large skein super bulky wool (one skein is enough)
One skein angora
needles
size 10 USA or whatever you need to get gauge
gauge
9.5 sts = 10 cm
(.95 sts/cm)
instructions
combine one thread wool and one thread angora
FRONT
Cast on 12 sts
row 1: P2, K8, P2
row 2: P1, inc 1, K1, P8, K1, inc 1, P1
row 3: K1, P2, K2, put 3sts on a cable needle and hold to the front, K3, K3 from cable needle, K1, P2
row 4: K1, inc 1, K2, P8, K2, inc 1, K1
row 5: K2, P2, K8, K2, P2
row 6: P1, inc 1, P1, K2, P8, K2, inc 1, P1
row 7: K3, P2, put 3 sts on a cable needle and hold to the back, K3, K3 from cable needle, P2, K3
Repeat rows 8-15 four times total--rows 8-39
row 8: P3, K2, P8, K2, P3
row 9: K3, P2, K8, P2, K3
row 10: P3,K2, P8, K2, P3
row 11: K3, P2, K2, put 3 sts on a cable needle and hold to front, K3, K3 from cable needle, P2, K3
row 12: P3,K2, P8, K2, P3
row 13: K3, P2, K8, P2, K3
row 14: P3, K2, P8, K2, P3
row 15: K3, P2, move 3 sts to cable needle and hold to back, K3, K3 from cable needle, P2, K3
row 40: P1, dec 1, P1, K2, P8, K2, dec 1, P1
row 41: K2, P2, K8, P2, K2
row 42: P1, dec 1, K2, P8, K2, dec 1, P1
row 43: K1, P2, K2, move 3 sts to cable needle, K3, K3 from cable needle, P2, K1
row 44: K1, dec 1, K1, P8, K1, dec 1, K1
row 45: P2, K8, P2
bind off
BACK
Cast on 12 sts
row 1: K12
row 2: P1, inc 1, P10, inc 1, P1
row 3: K14
row 4:P1, inc 1, P12, inc 1, P1
row 5: K16
row 6: P1, inc 1, P14, inc 1, P1
row 7: K18
row 8-39 Knit on the knit side, purl on the purl side.
row 40: P1, dec 1, P14, dec 1, P1
row 41: K16
row 42: P1, dec 1, K12, dec 1, P1
row 43: K14
row 44: P1, dec 1, P10, dec 1, P1
row 45: K 12
bind off
FINISHING
Block both pieces
Sew the front and back together along the sides
Turn RS out
Pick up 20 or 24 sts around the top with dpns
Rib K2, P2 around for neck until desired length
Use a piece of scrap yarn to attach the plug to the the hot water bottle
Insert the bottle into the cozy
Using this Pattern as a Recipe for Designing Your Own
You can really use this pattern as a recipe for designing your own Hot water bottle cozy. First, choose whatever yarn you want and whichever size needles. Next, figure out your guage: knit a 10 cm swatch and figure out your gauge by measuring how many stitches it takes to get 10 cm and divide by 10. That number will be your stitches per inch (your gauge).
A standard hot water bottle measures 19 cm at its widest and 12 cm at the top and bottom. Multiply the gauge number you just got by 12 to see how many stitches you have to cast on and by 19 to see how many stitches you need to increase up to. Take some graph paper and draw out your pattern.
Once you have your shape laid out on a graph paper you can pick whatever cable you want to run up the center.
When you measure to see how close you are to the top of the hot water bottle, be sure to pull the material to the right width. Stretch it horizontally across the bottle, or you will end up with a cover that is too short.
When you get to the height where the hot water bottle starts to narrow again, decrease until you have 12 cm again. At this point you will want to knit the back and then sew them together before knitting the ribbed neck of the cozy with double-pointed needles.
You don't need any kind of closure at the bottom. Just slip the hot water bottle in and it will stay fine.

Friday, April 18, 2008

Monday, April 14, 2008

Little Red Sweater + Matching Socks

justinesweater.png

I finally finished the sweater I was making for Justine's baby. I just sewed the buttons on it last weekend, and made a pair of matching pointy-toe socks.

Friday, April 11, 2008