I just made this hat for a friend's baby. It fits a baby head, 6-12 months. Read on for the pattern.
Materials:
Black and white yarn--I used Cascade brand 220 Superwash (100 grams/3.5oz 220 yards)
Size 8 (US) circular needles
Size 8 (US) double-pointed needles
Three stitch markers
The gauge is 1.5 sts for 1 cm, or 15 sts for 10 cm.
**********
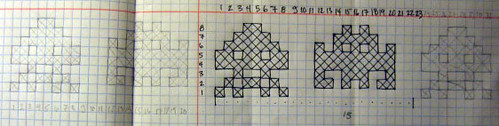
Charts
It'll probably be helpful to just draw the charts out for yourself on graph paper.
Chart #1

Chart #2
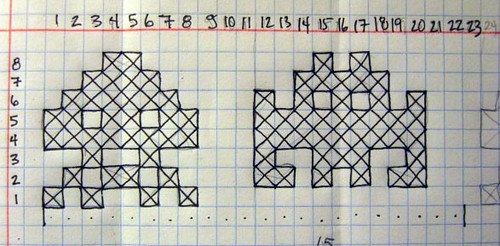
Chart #2, too
 *********
Instructions
1. Cast on 7 st with black yarn
2. Knit the ear flap, from the bottom up, following chart #1. You'll increase by 2 sts every other row until you have 17 sts. Add a st after the first st and right before the last st of every increase row. Don't despair if your increases leave holes that are kind of ugly. You can go in and patch them up a bit when you weave in the ends. Make the first and last stitch of every row pretty tight.
3. When you've got the earflap knitted according to the chart, cut the thread (kind of longish) and remove the flap from the needles to put it aside. You should finish on a wrong side row and be ready for a right side next.
4. Repeat step two (but not step three) for the second earflap.
5. When you've finished the chart for the second earflap, turn it over and knit across, continuing the seed stitch pattern on the edges.
6. Cast on 8 sts.
7. Put the other earflap on the right side of the circular needles. Knit across, continuing the seed stitch pattern on the edges.
8. Cast on 18 sts.
9. Join the two end of your knitting into a circle and knit around five rows in seed stitch, but knit in garter stitch over the garter stitches in the center of the two earflaps. You're making a garter stitch border around the hat.
10. Knit around three rows in garter stitch.
11. Find the center back of the hat and mark off three stitches on either side (6 sts between two markers). These are marking the beginning and end of the repeat space invader pattern that goes around the hat. 54 sts or 23 x 2 +8. Don't worry about the math unless you want to.
12. Knit past the first marker and right after the second marker, start the pattern from Chart #2 at the bottom left and read the chart from left to right. Because you're knitting in the round, you will read every row of the chart from left to right and from the bottom up. I drew out the entire pattern, even though you really only should need the two repeating invaders.
13. Knit chart #2.
14. Stockinette stitch 3 rows.
15. Begin decreases every 20 sts. Decrease 6 sts every other row for 8 rows.
16. Transfer knitting to double-pointed needles.
17. Decrease every row until you have only 8 or 9 sts left.
18. Tie off the top of the hat
19. Weave in loose ends.
20. Block flaps with a steamy iron to make them flat.
awesome!
ReplyDeleteReally neat.
ReplyDeleteSeems impossibly technical to non-knitwits like me.
How long did it take you to make it?
I like the use of lo-tech medium for high-tech image. Maybe your next hat could have a feed icon on it? (too soon, perhaps)
Let's hear it for space invaders inventor Tomohiro Nishikado 西角友宏.
and: space invader artist faq ooh he's doing rubik's cube art too! ooh rubik invader!! (head explodes)
That rubik's cube art is pretty cool.
ReplyDeleteI found a pattern for a grown-up hat, which is very nicely done, with the player's guns on the earflaps.
ReplyDeleteIt's on a blog for sci-fi knitting called Sci Fi Kal.
I like yours better. It's more rough, rugged, physical, which is a nice contrast to silly virtual pixel creatures.
ReplyDeleteMy hat got famous this morning. It made the Craft blog. This is particularly cool, because my other instructable about screen printing was on the Make blog last year.
ReplyDeleteI love glory!
This sweater is pretty amazing, but no pattern, helas.
ReplyDelete